Setting Up WSL for Angular
I’ve been using WSL for a while now, and I’ve come to prefer it over plain-old Windows for most development tasks.
It takes a little extra work to get Angular projects to play well with WSL, and since I work with Angular a lot, I decided to write down the steps I took to get set up.
Step 1. Install WSL 2
If you are just starting out with WSL, great! You don’t have a lot of baggage. But if you’ve been using WSL 1, I would highly recommend upgrading to WSL 2 before you get started setting up your Angular environment.
WSL 2 has a lot going for it, not least of which are the performance benefits it has over WSL 1. The one thing you lose by switching to WSL 2 is performant cross-OS filesystem access. However, if you follow this guide, I’ll show you what to do so that you will almost never need to do that.
If you already have a WSL 1 distro, you’ll have to upgrade it to version 2. There is a simple powershell command for this. From Microsoft:
wsl --set-version <distribution name> <versionNumber>
If you’re brand new to WSL, I would recommend following the WSL 2 installation guide from start to finish.
Also, don’t forget to install Windows Terminal!
Step 2. Install Node
I had a hard time getting the windows recommended nvm approach to work. Specifically, I kept running into performance issues with shell startup because nvm was doing work in the background. If you can make nvm work for you, that’s perfect! But in case you can’t, here’s what I did to install node on my WSL distro.
I’m using Ubuntu as my distro, so I’m able to use the apt package manager to install node. Use whatever package manager that’s compatible with your distro.
I followed this guide to install the version of node that I wanted. Here’s the meat of that guide:
$ curl -sL https://deb.nodesource.com/setup_12.x | sudo -E bash -
$ sudo apt install nodejs
You can change setup_12.x to setup_14.x if you want to install node 14, and you can find more node distributions at https://github.com/nodesource/distributions.
Run node -v to see if it worked.
Notes
If you’ve already been using node on Windows, you may have to uninstall node on the Windows side so it doesn’t show up in your $PATH, or else update your path to not point to that executable. You can run whereis node to see if the executable is coming from the Windows side. Look for anything coming from /mnt/c/.
If you have already installed node on your WSL distro via another method, you’ll need to uninstall the existing one. For me, I tried apt install node before enabling the NodeSource repository, and so I got an outdated version of node. Running apt remove nodejs first before re-installing from NodeSource worked for me.
Step 3 (Optional). Copy Config Files
I had been using git-bash for some time, and already had a lot of config files in C:/Users/norick such as .npmrc, .bashrc, etc. that I didn’t want to lose in the move.
There are a few things you can do here to keep those files, but my preferred method is just to copy the files from Windows to Linux:
$ cp -r /mnt/c/Users/norick/.npmrc ~/.npmrc
$ cp -r /mnt/c/Users/norick/.bashrc ~/.bashrc
Another (more complicated) option here is to soft-link your Windows User folder to your Linux User folder:
$ ln -s /mnt/c/User/norick /home/norick
Then, you can use the same config files for both Windows and Linux. However, I’d recommend copying the files to your Linux User folder, and never using git-bash or any other Windows-based terminal again. Life is much easier when you’ve switched 100% to Linux.
If you do opt to go this route, you’ll need to make sure to store all your project files in a folder separate from your home folder. I created another folder in /home called wsl-norick then linked to it from /home/norick:
$ ln -s /home/wsl-norick /home/norick/wsl
Step 4. Git Clone
If you’ve already been using git on Windows, you’ll need to start from scratch on Linux. Make sure to get the newest version of git specifically for Linux: apt install git.
Even if you’ve already cloned your project on the Windows side, you’ll need to clone it again on the Linux side.
Step 5. VSCode for WSL
I’ve seen a lot of folks use VSCode for Angular projects (and so do I), so here’s how I set up VSCode for WSL.
Install VSCode on the Windows side, if you haven’t already.
Using this setup, VSCode runs slowly when trying to access WSL projects from Windows. But thankfully, the VSCode devs came up with a solution. Simply install this extension and you’ll be good to go.
Step 6. Chrome and VcXsrv
One thing I had a hard time with when I first switched to WSL was the ability to run Karma tests. The problem I had is that my code was now running in Linux, but the Chrome browser used for testing was still running on Windows. The solution I found was to install Chrome on Linux, and then use VcXsrv to see that Linux window on Windows.
Install Chrome
You can install the Linux version of Chrome here.
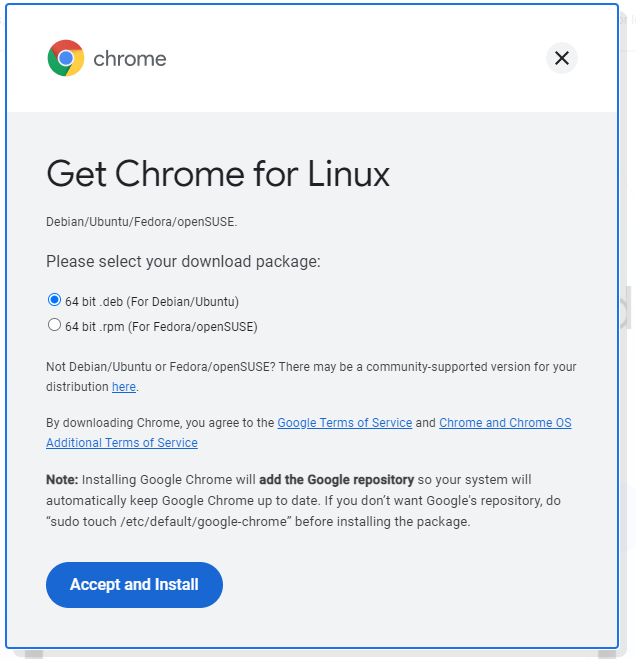
Once downloaded, copy the .deb file over to the Linux side then install it with sudo apt install ./<chrome_file>.deb. Now, you should be able to access the the google-chrome executable on your command line, but you won’t yet be able to see the Chrome browser. For that you’ll have to…
Install VcXsrv
VcXsrv lets you run Linux GUIs on Windows. This turns out to be really useful for things like automated browser testing among many other things. Getting set up requires just a little bit of configuration. I was able to just follow this guide.
Once you’ve followed the guide to install the X-server, follow these steps to have VcXsrv run on startup:
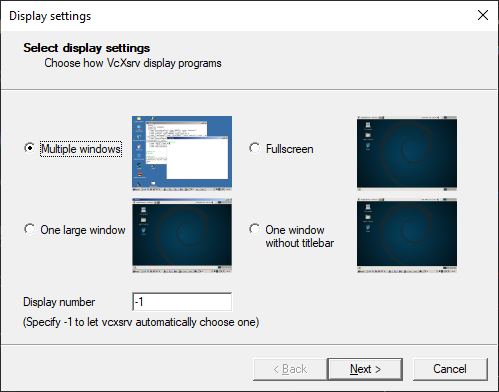
- Launch
VcXsrvfrom Windows - Chose Multiple Windows and Display number: -1; Click Next
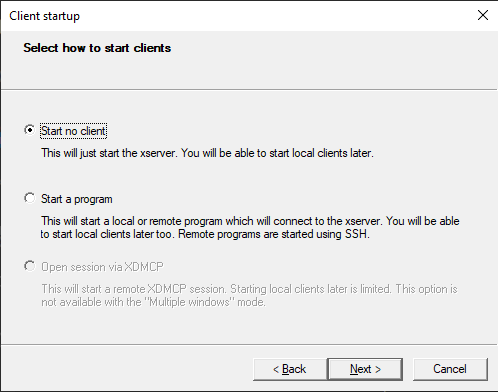
- Chose Start no Client and click Next
- Make sure all the following are checked and click next:
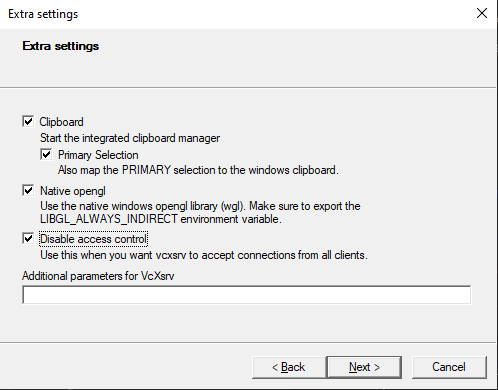
1. "Clipboard","Primary Selection"
1. "Native opengl"
1. "Disable Access Control" 1. Before finishing, click "Save Configuration" and store it somewhere you'll remember 1. Click Finish to start VcXsrv 1. Move the config file you saved to `%AppData%\Microsoft\Windows\Start Menu\Programs\Startup`
Now that VcXsrv is running, you can run Chrome from Linux using the command google-chrome. If everything worked, you should be able to see the Linux Chrome browser on your Windows side as a regular-looking Windows window.

I just want to pause to think about how exciting this actually is! You’re running Linux inside Windows, Linux is running Chrome, Linux is telling Windows to display the GUI for Chrome, and ultimately Windows is displaying Chrome as a regular-looking window.
7. Run your Karma Tests
Now, you should be set to run your tests like you normally would. For me, I open my Linux command line to my project folder, and run npm test. If your tests are configured to use the Chrome browser, you should see Chrome open on your Windows side and the tests run like normal.
8. Conclusion
Now that you’ve got your WSL setup, you can start using WSL in your Angular projects, say goodbye to Windows tools, and say hello to productivity!